Plugin Architecture
Phoenix uses a modular plugin system that allows features to be developed, tested, and deployed independently while sharing a common platform infrastructure.
Plugin System
A PluginBase abstract class provides sensible defaults for optional members, so most plugins only need to override the methods they actually use.
.csproj Project File
Defines the C# project, NuGet dependencies, and references to Phoenix.Core. Each plugin is a standalone .NET class library.
Plugin Class (C#)
The backend implementation: IPlugin interface, database entities, pipelines, hooks, API endpoints, and service registrations.
plugin.json (Frontend)
Declares frontend routes, components, extension points, and assets that the Remix UI should load for this plugin.
Each plugin specifies its own database entities, API endpoints, pipelines, and frontend code. This isolation means plugins can be developed, tested, and deployed independently without modifying core platform code.
Plugin Lifecycle
Initialization Sequence
RegisterServices
Called during application build. Each plugin registers its DI services, repositories, pipeline handlers, and configuration options into the shared service collection.
OnModelCreating
Called when Entity Framework builds the database model. Each plugin configures its own entity mappings, indexes, relationships, and schema isolation.
OnStartup
Called after the application is built. Plugins can map endpoints, register middleware, seed data, or perform any startup initialization.
Workflow Taxonomy
Connector plugins use WorkflowVendor and WorkflowProduct properties to categorize their pipelines within the workflow engine. This taxonomy enables the platform to route workflows to the correct connector implementation.
Submodules & Git
Creating Branches
Creating a branch simply adds a new pointer to the current commit. You can then switch to it and start making independent changes without affecting the original branch.
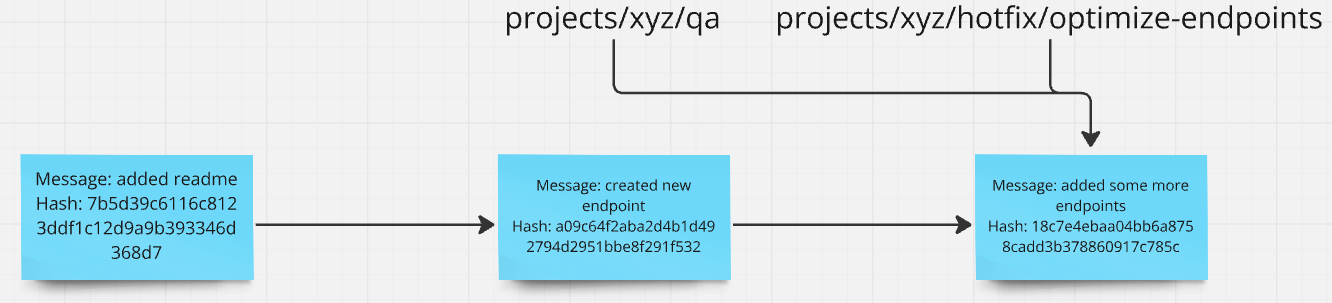
Branch Divergence
When commits are made on different branches, the branches diverge. Each branch has its own line of history, and they can later be merged back together.

What Are Submodules?
A Git submodule is a reference to another Git repository embedded within your project. Rather than copying code, the parent repository stores a pointer to a specific commit in the submodule's repository. This means the submodule's code lives in its own repository with its own history, branches, and pull requests—but it appears as a folder in your project.
- check_circle Shared bug fixes: Fix a bug in the plugin once, and every project using that plugin gets the fix when they update their submodule reference.
- check_circle No manual cherry-picking: Without submodules, you would need to manually copy changes between projects or maintain complex cherry-pick workflows.
- check_circle Shared code stays live: The plugin code in your project is not a snapshot—it is a live link to the plugin repository, making collaboration seamless.
Submodule Status
When a submodule has changes or is pointing to a different commit than what the parent expects, git status will show the submodule as modified. The status shows the submodule folder with a special notation indicating the commit reference has changed.

Working with Submodules
git submodule update --init
git submodule foreach git pull origin develop
Detached HEAD State
When you enter a submodule directory, you are typically in a detached HEAD state. This means HEAD points directly to a commit rather than a branch. Before making changes inside a submodule, always check out a branch first (e.g., git checkout develop) to avoid losing commits.
Adding a Plugin to a Project
Click the Clone button
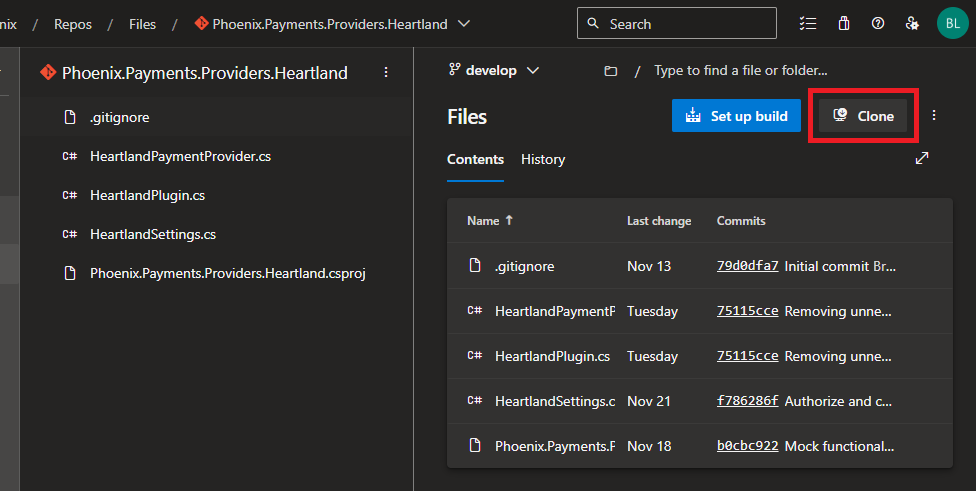
Copy the HTTPS URL
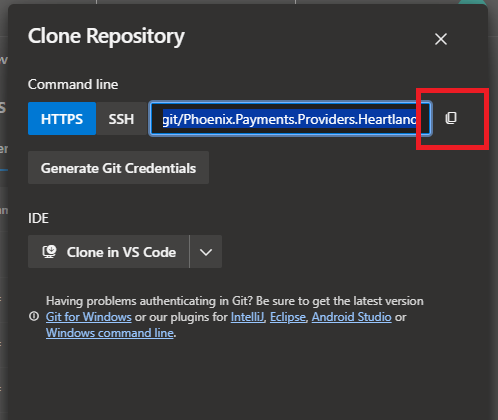
Add the Submodule
Run the submodule add command from the project root, targeting the /Plugins folder.
git submodule add <CLONE_URL> Plugins/Phoenix.YourPlugin
Fix .gitmodules
Verify the .gitmodules file has the correct path and URL for the new submodule entry. Ensure the path matches your intended directory structure.
Add to Visual Studio Solution
In Visual Studio, right-click the solution and select "Add Existing Project" to include the plugin's .csproj file.

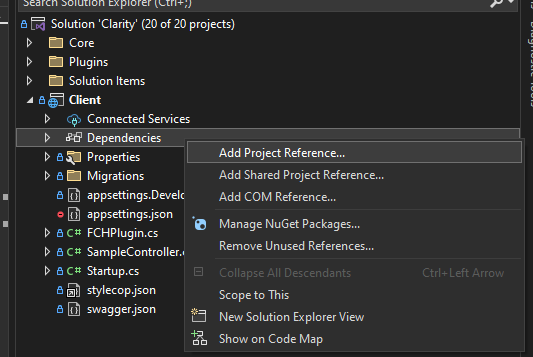
Add Project Reference
Add a project reference from the client/host project to the plugin project so it compiles and links correctly.
Register in Startup.cs
Add the plugin to the registration chain in Startup.cs.
builder.AddPhoenixPlugin<YourPlugin>();
Configure Frontend
Add the plugin to the plugins array in the project's package.json so the Remix build system includes the plugin's frontend code.
{
 "plugins": [
 "phoenix-site",
 "phoenix-payments",
 "phoenix-your-plugin"
 ]
}
Updating Submodule References
When a plugin has been updated in its own repository, you need to update the submodule reference in the parent project. Navigate into the submodule directory, pull the latest changes, then go back to the parent and commit the updated reference.
When your changes span both the plugin and the host project, create separate pull requests for each repository. In the host project's PR description, include a link to the plugin's PR so reviewers understand the full scope of changes. Merge the plugin PR first, then update the submodule reference and merge the host PR.
Plugin Catalog
Frequently Asked Questions
Each plugin lives in its own Git repository and is added to the main project as a Git submodule. This provides independent version control, branching, and release cycles for each plugin. The main repository tracks specific commits of each submodule, ensuring reproducible builds. Plugin updates are pulled by advancing the submodule pointer. See Submodules.
Adding a plugin involves: creating a new .NET class library project implementing IPlugin, registering the plugin in the Client's Startup.cs, and adding the project as a Git submodule. The IPlugin interface requires implementing RegisterServices (for dependency injection), RegisterPipelines (for pipeline and hook registration), and RunMigrations (for database schema setup). Once registered, the plugin's pipelines, entities, and frontend extensions are automatically available. See Adding a Submodule.